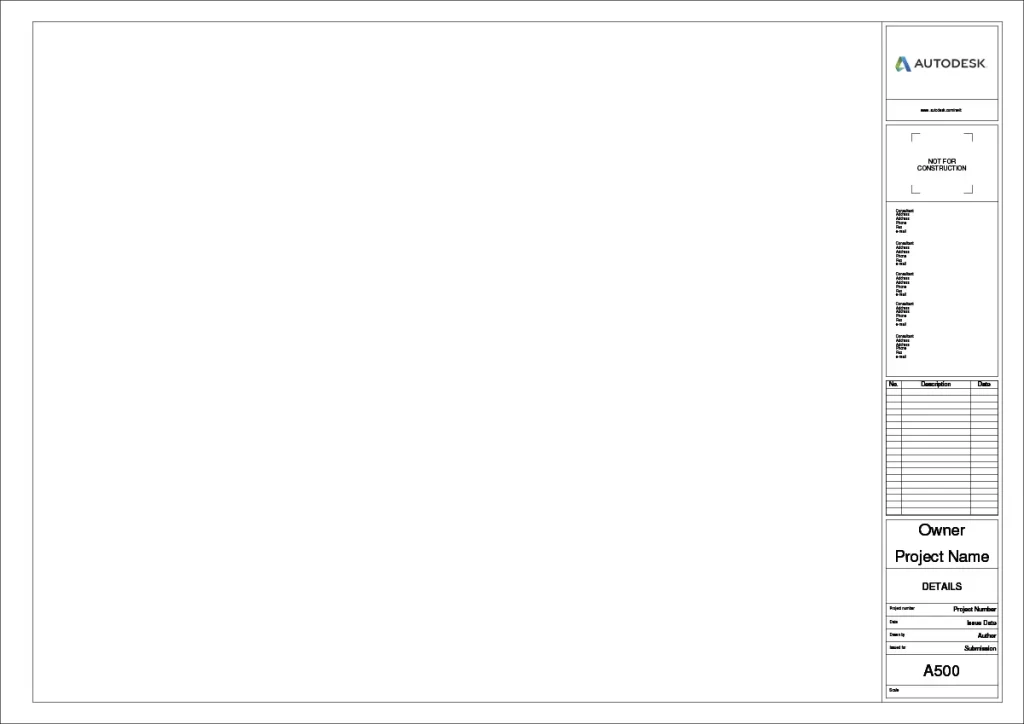
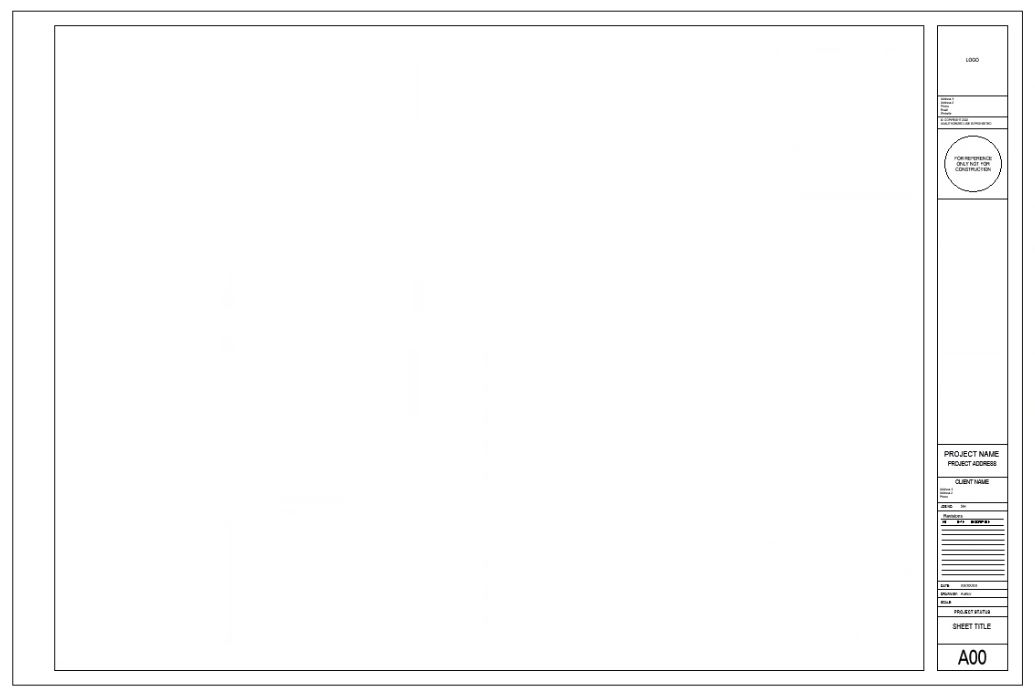
Title blocks are essential for all sheets (aka pages) in a construction drawing set. They tell the viewer information about the project, such as: what the project is and where it’s located, who created the drawings, the date of the drawings, and more. Should a single sheet be separated from the rest of the drawing set, the title block includes all the information needed for the viewer to connect it to the rest of the drawings.
There’s some flexibility in how the information is arranged in the title block, but conventions should be followed when designing your own. We’ll discuss what information needs to be included, what information might be included, and how it should all layout.
In some cases, the client will dictate the arrangement of the title block or provide one for the architect and consultants to use. This is most common for large corporations or higher education institutions. These organizations have entire portfolios of buildings that need to be maintained and prefer to have the drawings created to their standards.
What should be included in the title block?
Any architect or drafter will need to create a standard title block for themselves and the work they produce. The following is the minimum information that should be included on any title block.
Name, contact info, and logo of the architect
Knowing who did the drawings and how to contact them if needed is a critical piece of information. Include the name, address, and phone number of the company at a minimum.
When the architect hires engineers and consultants, they will often use the architect’s title block. When this occurs, the consultant needs to include their information as well.
Designated area for the architect’s stamp
Having a stamped set of drawings indicates to the viewer that these documents have been reviewed and approved by the architect. Stamps could be needed when applying for a building permit or when seeking regulatory approval.
Name and address of the project
The client or the architect should determine the project’s name so that everyone uses the same one. Choosing a project name ensures that everyone is referring to the project in the same way and will help avoid confusion, especially when filling out applications or other paperwork. An address is also needed so the project can be located.
Client information
Usually, just including the client’s name is sufficient, but sometimes their address and phone number are included as well.
Architect’s project number
Creating a unique project number for each job will help organize files on your computer and for keeping track of billing or other paperwork. How you format the project numbers doesn’t really matter as long as you’re consistent. Incorporating the year into it is common, especially since many of us think chronologically.
“Drawn by” section
It’s common practice for the primary drafter of the sheet to add their initials. Some offices also have a “checked by” area so that the project manager or quality control staff can initial after they’ve reviewed the sheet.
Knowing who worked on the drawing can come in handy years later when something comes up and the office needs to know who worked on the associated sheet.
Sheet name
Every sheet should have a name describing what the contents of that sheet are. This helps contractors and reviewers to quickly identify where to find the information they are looking for in the table of contents.
Sheet Number
The sheet number is one of the most essential elements of the title block. This is one element that never changes and is located in the bottom right-hand corner of the sheet. Sheet numbers give every page in the drawing set a unique designation so that it can be referred to when calling out drawings or when the sheet is listed in the table of contents.
Date
Another critical piece of information is the date which indicates when the sheet was issued. Over the project’s lifetime, there could be several submissions; drawings for pricing, progress drawings at different design phases, permit set, conformed set, etc. Including a date helps the reader ensure that they are viewing the correct version of the drawing.
Title of submission / current Phase
Similarly to the date, giving the drawings a name based on the submission will help identify the correct drawings. Over the lifetime of the design of a project, you may issue several sets of drawings for different reasons. For example: drawing sets at each phase for approval by the client, pricing sets, a set for permit, etc.
Space to list revisions
There are almost always revisions that need to be made to a set of drawings after they’ve been formally issued. For example, revisions may need to be made in the bidding and negotiation phase based on RFIs or if the design team wants to provide additional information to the bidders. In construction, change orders, clarifications, or RFIs may lead to revisions to the drawings.
Changes to the drawings are clouded and marked with a revision tag (usually a number). This tag is listed in the revisions area of the title block. The revision should be listed with a date and a short description of the change. For example: “RFI3 change the door 001”.
Copyright info
Understanding copyright laws is a complicated subject and would be better explained by a lawyer. But it’s important to know that there are protections on the intellectual property of architects. If you’d like a little more information, take a look at this article.

Optional items to include in a title block
Client’s logo
Including the client’s logo isn’t always necessary for commercial projects, but some clients request it. It also helps to show that they aren’t just the client but part of the team.
Key plan
Adding a key plan to the title block ensures that it’s shown on every sheet. Sometimes, buildings must be broken up into several sections (see this article about types of floor plans). This can make the drawings confusing for people who are less familiar with the project than the design team. Showing the key plan will make flipping through the drawings easier. Also, some drafters like to key in exterior elevations or sections on the key plan on those respective sheets.
North arrow
A north arrow should always be included on the plans, but including it as part of the title block is a personal preference. Some architects prefer to make it part of the drawing, while others locate it in the title block so that it’s always remembered.
Design team’s information
The entire design team should be included in the drawings. While it’s helpful to list all parties on the title block so their information can be easily found, the information takes up a lot of space. An alternative is to list the project team on the cover sheet.
Other Layout Considerations
Sheet Sizes
There are variations in sheet sizes, but a 24″x36″ sheet is the most commonly used for commercial projects. A smaller sheet size, like 12″x18″, can be used for single-family homes. 30″x42″ sheets might be used for larger commercial projects like warehouses or historic Mills. This size, however, can be cumbersome to work with; the large size makes the drawing sets heavy and hard to flip through.
Vertical vs Horizontal?
It’s standard for sheets to be viewed and read in landscape orientation (meaning the widest dimension is perpendicular to the viewer). Most often, title blocks are vertical, meaning they are on the right-hand edge of the page spanning from top to bottom of the sheet.
Depending on the size and shape of your building, you may want to use a horizontal title block that spans the bottom edge of the drawing. Just ensure that the drawing number and title are in the bottom right-hand corner, similar to a vertical title block.
Margins
Margins are not only crucial for ensuring that everything drawn is within the print area, but drawings are usually stapled and bound, which require a certain amount of space. Typically around 1 1/2″ is sufficient for stapling a full-size set. If you like to work with half-size sets, leaving 2″ is better.
Free title block for download
How to number views on a sheet
No “rule” describes how to lay out views on a sheet. The least common way I’ve seen is numbering the drawings and placing them on the sheets in the way we are traditionally taught to read, meaning from top left to bottom right. Since sheets are flipped through by looking at the sheet number in the bottom right-hand corner, there’s a logic behind placing the first drawing in the bottom right-hand corner next to it. Where you go from there is up for debate.
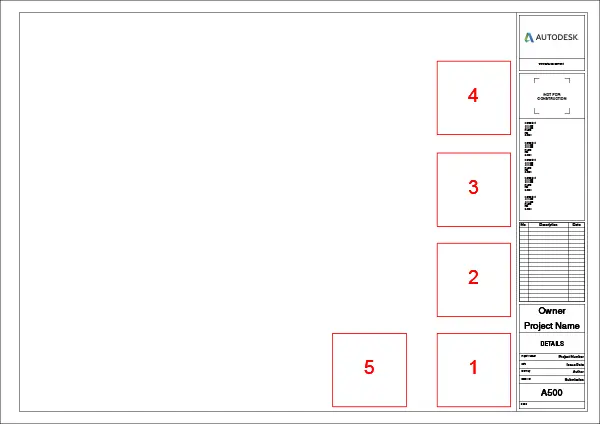
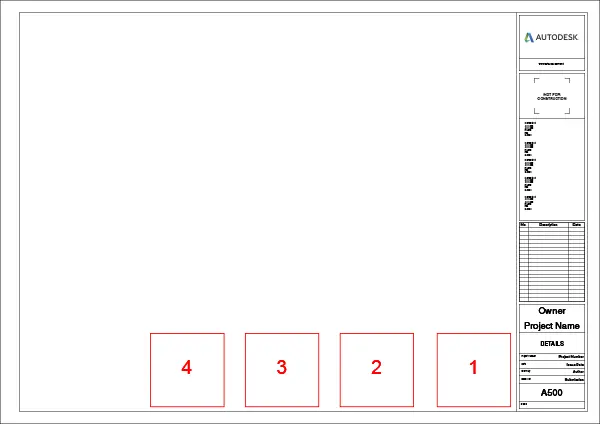
It’s common practice to use a grid (that may or may not be printed) to organize sheets that contain many drawings. In this case, some architects will label the grid (with letters on the x-axis and numbers on the y-axis) so that each box can be identified. This makes it easy to locate specific parts of a drawing.