Imagine getting a bill from a roofing contractor with a line item for an Ice and Water Shield. Was it really necessary? Or are you preparing to re-roof your home yourself and want to make sure you do it right? This article will give you the perfect foundation for understanding what Ice and Water Shield is, if you need it, and its uses.
- What is Ice and Water Shield and what does it do?
- Does code require it?
- Where does an ice and water barrier go?
- Do I need it for my whole roof?
- Is it required under metal roofing?
- Is ice and water shield required on my shed or detached garage?
- Are there different types?
- When should it be installed?
- How long does it last?
- Can you install it on walls?
- How to install Ice and Water Shield
- Ice and Water Shield vs felt paper
- How much do I need?
- Cost
- Final Thoughts
What is Ice and Water Shield and what does it do?
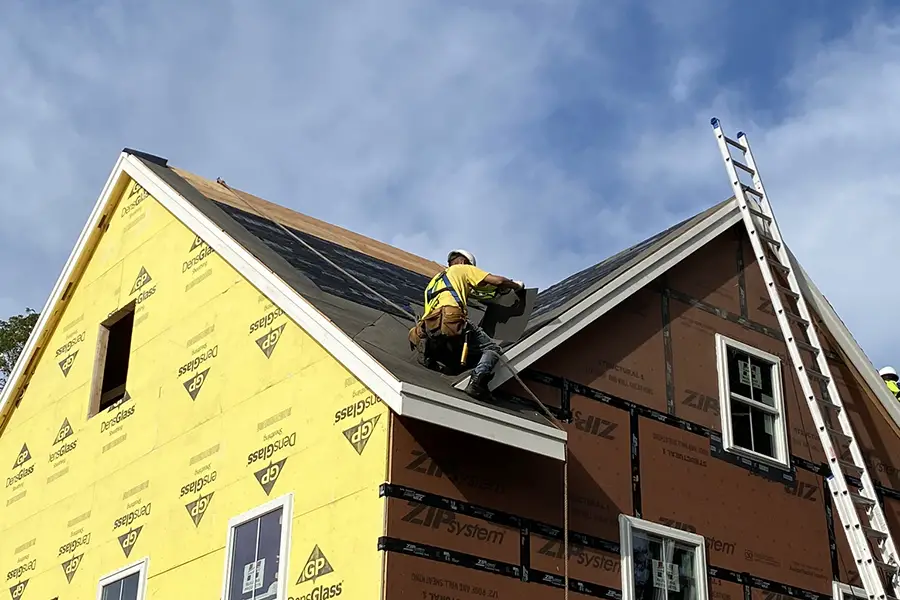
Ice and Water Shield is a stretchable rubberized asphalt membrane. It’s built to be waterproof and durable and is designed to self-seal around the fasteners that penetrate it, keeping it waterproof. It’s incredibly sticky and has a removable paper backing that is peeled off when installed. It’s typically applied to areas susceptible to leaking because it performs better than typical roofing felt or underlayments and protects against ice dams or wind-driven rain.
One thing to remember is that Ice and Water Shield is actually a trademarked name, and has become the “Kleenex” of the industry. It is referred to generically in the Internation Residential Code as an ice barrier and it can go by other generic names such as ice and water barrier, ice and water protector, leak barrier, or waterproof shingle underlayment.
Does code require it?
Yes, ice and water shield is required in some parts of the country by code. The residential code will point you to table R301.2(1) to determine if it’s needed. If you’re looking at the standard IRC (meaning not your state-specific building code) the table will be blank. It’s up to your state or jurisdiction to fill out that table, so you’ll need to go to your state’s building code to find a filled-out version.
An ice barrier isn’t just required for asphalt shingle roofs. You’ll need it for metal roof shingles, mineral surface roll roofing, slate shingles, and wood shingles or shakes as well.
On low slope roofs with a pitch between 2:12-4:12, two layers of underlayment are required to protect against wind-driven rain given the fact that the water will shed much more slowly. If preferred, an ice barrier can be used to cover the entire roof instead of using two layers of roofing underlayment.
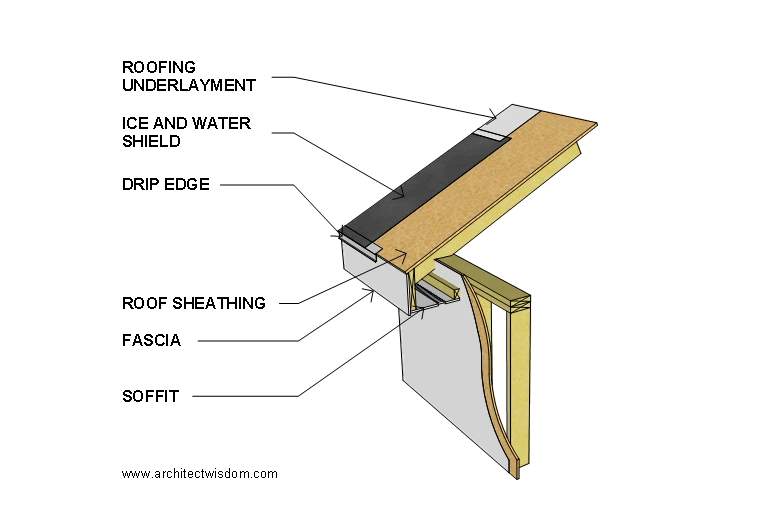
Where does an ice and water barrier go?
Ice and Water Shield is typically thought of being used at the roof eaves, but can and should be used in any of the following areas:
- Roof eaves – the edge of the roof at the bottom of the slope where gutters usually are
- Roof rakes – the edge of the roof along the slope
- Roof penetrations – beneath the flashing of things like a vent stack
- Valleys – sometimes in addition to a metal flashing
- Transitions from roof to wall
- On and around dormers
- Skylights
- Low slope roofs
- Any areas prone to leaking or snow build-up
Do I need it for my whole roof?
Generally, Ice and Water Shield does not need to be applied to the whole roof. For a steep roof (over 4:12) you could apply it to the entire roof, but it’s probably overkill and an added expense. For a low slope roof with shingles (4:12 or less), it’s an option to meet the underlayment requirements dictated by the IRC. When installing on a complicated roof with dormers, valleys, etc. you may find that most of your roof is already covered with an ice barrier and it may be easier to finish the entire roof with that, rather than work with two different materials. This will have to be a judgment call for you or your roofing contractor weighing the cost vs the benefits.
Is it required under metal roofing?
An ice barrier is still recommended under a metal roof where underlayment is normally required. However, it is essential that the correct ice barrier be used! A high heat underlayment is essential. This type of ice shield will be able to withstand the temperature that builds up underneath the metal roof in the summer which can actually melt the typical ice and water shield material. The fibers on top of the ice and water shield also allow for independent movement due to the expansion and contraction of the metals during changing temperatures.
Is ice and water shield required on my shed or detached garage?
The residential code states that there is an exception for ice barriers on detached accessory structures that don’t have heating and cooling. Even if you don’t have a permanent heating system in that space, but bring a heater out for occasional jobs, or you live in a high-wind area, it might be beneficial to add ice and water shield.
Are there different types?
As stated before, Grace’s Ice and Water Shield is the gold standard of the industry although many of the popular roofing manufacturers have created their own version. Companies like Owens Corner, GAF, Atlas, and Certainteed all have their own and may even require it as part of a complete “system” for their warranty. Beyond meeting the warranty requirements, there can sometimes be a benefit to getting all of your roofing components from one place. You’ll know that the components work well together and the contractor may get a better price from the manufacturer.
There are generally a few different types of ice barrier:
- Granular/Premium – less slippery so safer for roofers to install
- Economy/Builder – cheaper, more slippery, and not durable
- High heat – for metal roofs
There will be a big swing in price between manufacturers and with that change in price comes a change in quality. The cheapest ice barrier on the shelf will technically meet code, but may not be as sticky, durable, easy to work worth, etc. Also, make sure your roofing contractor is charging you for the ice membrane that they are actually providing. You don’t want to pay for a premium product and not get it.
When should it be installed?
A waterproof shingle underlayment should be installed anytime that you are re-roofing and removing the previous layer of shingles. It should also be installed whenever a new addition or Dormer is built and can be beneficial to be installed at new penetrations with shingles will need to be replaced.
How long does it last?
Ice and water barriers should last the life of your shingles if installed properly, but they are susceptible to UV light damage while exposed during construction. Although they are designed to be exposed to the elements and be used as a temporary roof before shingle installation, exposure should be limited to 30 days up to 90 days, depending on what the manufacturer recommends.
Can you install it on walls?
Ice and Water Shield isn’t just for roofs. It’s also commonly used when building decks and porches and can be used in someplace like the bottom of the column to protect it from groundwater and rain splashing.
How to install Ice and Water Shield
First and foremost, you should always follow the manufacturer’s instructions as different brands or grades will have different requirements. But generally speaking, you’ll unroll the membrane and cut it to the length you need. Get the sheet in place and then peel off the backing and press the material against the roof sheathing ensuring that it’s fully adhered. It’s definitely easier to install with two people, especially on a windy day. If you are installing it alone, you can staple it to the roof substrate to keep it in place since it is self-healing.
The code states that the ice and water barrier should extend 24 inches minimum from the inside face of the exterior wall toward the inside of the building. This means that you’re likely to need two strips of ice barrier to meet this requirement.
Be sure to check the manufacturer’s installation instructions. Each manufacturer will have slightly different requirements. They may also have tips on how to install. For example, Grace’s Ice and Water Shield has markings to make it easy and quick to lap additional layers over it without measuring.
One point of contention is regarding the order that the drip edge and the ice and water barrier are installed. Code says to install the drip edge first and lap the ice and water shield over the drip edge. The code also says that the builder should follow the manufacturer’s recommended instructions, which may require something above and beyond the code. Check out the manufacturer’s instructions and this article from JLC about the different methods of installation.
Ice and Water Shield vs felt paper
Although these are two similar products, they both play distinct roles in roofing. Felt paper, which may also be referred to as tar paper, is made of natural fibers that are coated with bitumen (asphalt) to make it waterproof. Standard thicknesses are referred to as 15-pound and 30-pound. The 15-pound is lighter, cheaper, and easier to work with in some ways, while the 30-pound is heavier, stiffer, more durable, and resistant to tearing. There are synthetic roofing underlayments available as well and are most common today. Although it’s more expensive, synthetic roofing underlayment is lighter in weight, durable, and can be left exposed for longer periods of time. Any of these options are held in place with nails when installed.
These roofing underlayments are meant to cover the entire roof surface to protect the substrate from water infiltration and they prolong the life of the shingles by keeping them separate from the plywood substrate. Ice and water barriers are self-adhering, fully waterproof, extremely durable, and more expensive. They are usually only installed in the areas of the roof most prone to leaking.
How much do I need?
How much ice and water barrier you need will depend on the total linear footage of eaves, rakes, and valleys, the depth of your overhangs, number of roof penetrations, amount of low sloped areas, and roof transitions like dormers. In this simplified example, we have a 32’x48′ gable roof house with a 9:12 pitch. The 12″ roof overhang will require that two strips of ice and water barrier be used at the eaves. You should be able to use four 75′ rolls of Ice and Water Shield and have some remaining for small penetrations. Your typical 2,000 sf house (not as simple as this) would be somewhere around 6-8 rolls depending on how complicated the roof is.
Cost
With cost comes a big difference in quality. Generally speaking, you can usually plan on around +/-$3.00 per square foot for installed ice and water barrier. At the time of this article, Grace Ice and Water Shield was $154 for a 36″x75′ roll (+/-$0.68 a square foot) at Lowes. In comparison, the same size roll of Owens Corning’s Weatherlock and GAF’s Stormguard came to $0.40 per sf and $0.46 per square foot respectively.
Final Thoughts
Ice and Water Shield, or similar products, are essential in creating and maintaining a long-lasting roof assembly. Check with the local building codes for specific requirements in your area. Also, be sure to check the recommendations of the different roofing components you are using to see how and where an ice barrier should be used and what kind is best for your application.
All code references in this article are based on the 2018 IRC.
Thank you for informing us that some countries require ice and water shields for the roof eaves to protect areas that are prone to leaking by keeping them waterproof. I want to get ice guards for my roof soon while it’s still summer since it might be too late if I wait until winter to install them when the snow has already begun to fall. I’ll keep this in mind while I look for where I can get custom ice guards for my roof soon.