Photo © scott tennant (cc-by-sa/2.0)
The long and short of it (no pun intended), is that blocking is often required for floor joists prior to installing the subfloor, depending on the length and span of the specific joist.
What is blocking and why is it used?
Blocking is the process of installing pieces of lumber to assist with a task as part of the construction process. It might be plywood installed behind drywall to make it easier to install upper kitchen cabinets (no need to hit studs!). Or it could be 2X’s installed in a shear wall to provide additional lateral stability to the building. In terms of floor joists, blocking is installed at 90-degree angles between, and level to, the floor joists. It provides lateral strength and better weight distribution for the load on the floor, and helps compensate for twisting or warping in the joist boards. Blocking can help fix or prevent bouncy and squeaky floors and keeps joists plumb.
How often is it needed?
Overall, the amount of blocking depends on the size and the run of the joist. The common recommendation is that for 8’ or less, no blocking is required. So for 8’-12’, 1 block, 12’-18’, 2 blocks, 18’-24’ 3 blocks, and so on. Blocking should be equally spaced and run in a line across the room perpendicular to the joist run. So for 1 block, it should be placed at the midpoint of the run, for 2 blocks, equally spaced from each other and either end, 3 blocks equal spacing, etc.
What does the IRC say?
The IRC requires that for joists 12” or deeper, blocking be made of solid, full depth pieces of no less than utility-grade lumber, at a minimum of 2” thickness. Intervals are not to exceed 8’. The IRC also defers to the manufacturer’s specifications for engineered joist materials.
Do you need blocking for I-Joists?
It depends on the manufacturer. Most will provide specific recommendations and instructions for best installation practices. Overall, it’s recommended that I-joist blocking also be made from engineered wood, rather than sawn lumber. Sawn lumber can warp or alter over time, and keeping the material consistent will minimize that risk. This link offers a recommendation for how to create blocking for i-joists with materials on-hand.
Installation Tips
- Use a chalk line to mark across all the joists where the block/blocks should be installed
- As it can be challenging to install the blocks in a perfectly straight line, consider alternating either side off said center chalk line for ease of installation
- Install blocking prior to subfloor installation
- Install starting from the outside and working their way towards the center of the room, with the final piece or pieces being in the center. This helps avoid potentially creating a bow in the joists that gradually increases. If your block is even 1/16” off on each piece, that could impact and create an issue by the time you reach the opposing wall. Alternatively, measure 3 times cut once!
What about blocking for floor trusses?
Floor trusses obviously cannot be blocked in the same way that a solid joist or I beam can. However, that doesn’t mean that they can’t benefit from additional perpendicular structural support. As always, follow the manufacturer’s specific installation instructions, but there are also a few other approaches for reinforcement. For example, for 2×4 trusses, you can add a block running on top of the wall in between each truss. For spans longer than 16’, you can install a center stabilizing board secured to the vertical webbing. See the video below for more info.
Other variations of blocking: Cross bracing Vs. Bridging
Now that we know what blocking is, what do the terms bridging and cross-bracing refer to?
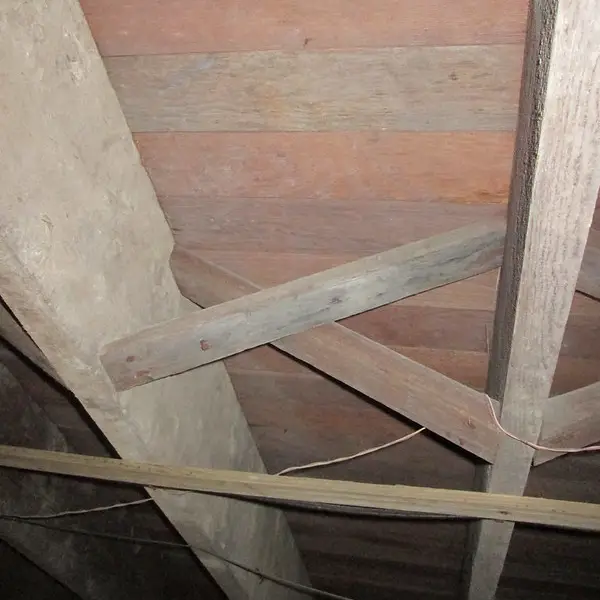
Cross-bracing
Rather than a single solid block, two crossing pieces are installed in an “x” shape. This is done with smaller woodblocks. There is no definitive standard for the size of this wood, it could be 2×2 or 2×4, or even 1×2. It provides the same overall structural benefits as blocking but makes it much easier to run plumbing or electrical lines through the joist bay.
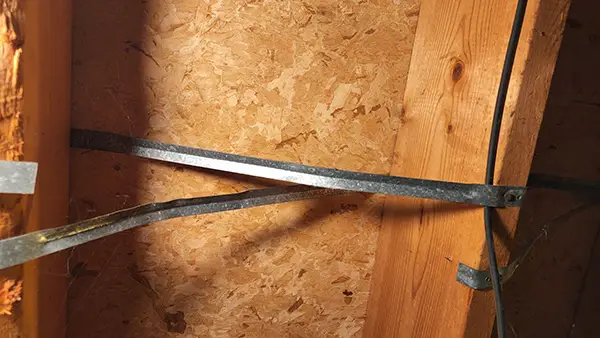
Metal bridging
Metal bridging provides the same overall function. These are typically steel pieces with two flat ends. They are designed to be nailed into the top of one joist and the bottom of its opposing neighbor.
Some things to consider:
- it can take longer to cut each cross brace at the correct angle, whereas no cutting is required with the metal counterpart
- Metal bridging often comes in “nail-less” options, meaning the end of the bridging is spiked and is hammered directly into the joist
- It’s even thinner than the wood, leaving more space in the joist bay for other trades to do their work.
The disadvantages of metal bridging are that the nailed versions cannot be installed after a subfloor has been laid down and that the “nail-less” versions could pop out over time if the joist does twist or warp.
Wrap up
Overall, to achieve the benefits of blocking/bridging/bracing, you may need no other tools or materials other than what already exists at your job site. There’s no conclusive study indicating one method is stronger than the other, just that it is necessary!